|
|
|
|
|
How to carve a text scar into skin using Photoshop
A bit longer Photoshop tutorial, but still very suitable for beginners, where you will learn how to carve a random text into human skin from scratch and make it look realistic.
|
|
 |
|
|
|
|
|
|
|
|
|
|
 |
1.
|
|
|
Open a photo of a person you want to carve some text on.
I'm going to use Walter's forehead.
Also recommended:
|
|
| |
2.
|
|
|
Choose the Horizontal Type Tool (T for keyboard shortcut).
|
|
| |
3.
|
|
|
Choose a carve like font.
Click here to download the font used in this tutorial.
Click here to learn how to install fonts in Windows 7.
|
|
| |
4.
|
|
|
Write some text onto the skin.
Press Ctrl + T to resize and rotate the text the way you want it then press Enter.
|
|
| |
5.
|
|
|
Hold Ctrl and click the text thumbnail in Layers to select the text (see picture).
|
|
| |
6.
|
|
|
Now delete the text layer ...
|
|
| |
7.
|
|
|
... and press Ctrl + J to create a new layer from the selection.
|
|
| |
8.
|
|
|
Now choose the new layer, click the blending options fx button and choose Bevel and Emboss...
|
|
| |
9.
|
|
|
Choose the similar settings as I did ...
|
|
| |
10.
|
|
|
... set the Highlight Mode to Screen and click the color rectangle (see picture).
|
|
| |
11.
|
|
|
Now click the area where the skin is lighter.
|
|
| |
12.
|
|
|
... now choose the Shadow Mode color square ...
|
|
| |
13.
|
|
|
... and choose the darkest part of the skin.
Forehead wrinkle in my case.
|
|
| |
14.
|
|
|
Set the Highlight Mode opacity to about 65 and Shadow Mode opacity to about 82 %.
Don't close the blending options window yet ...
|
|
| |
15.
|
|
|
In the left pane click to choose the Inner Shadow settings and choose the similar settings as I did.
|
|
| |
16.
|
|
|
In the left pane click to choose the Outer Glow settings and choose the similar settings as I did.
Choose a darker blood like red color by clicking the color square.
|
|
| |
17.
|
|
|
In the left pane click to choose the Inner Glow settings and choose the similar settings as I did.
Choose a lighter red color by clicking the color square.
Don't close the blending options window yet ...
|
|
| |
18.
|
|
|
In the left pane click to choose the Pattern Overlay settings and choose the similar settings as I did.
Click OK to confirm all the blending mode settings you did.
|
|
| |
19.
|
|
|
That's about how it should look like by now, we are pretty close to the end.
|
|
| |
20.
|
|
|
Press Ctrl + T to enter the free transform mode, right click the carving and choose Warp.
|
|
| |
21.
|
|
|
Adjust the text to the shape of the skin, forehead in my case, by dragging the handles and corners.
Press Enter when done.
|
|
| |
22.
|
|
|
Set the carving layer Opacity to about 93%
|
|
| |
23.
|
|
|
You can always change the color of the scar by going into the Blending options again and choosing different red in the Inner Glow settings.
When you are satisfied with your skin carve scar, merge the layers by clicking Layer in the menu and choosing Flatten Image. To make the scar even more realistic, choose the Burn Tool set the Exposure in the tool bar to about 50% and click the certain parts to make them a bit darker.
|
|
|
 |
|
 |
|
 |
|
|
| |
|
|
|
|
|
| Nice one. Can I carve a picture too? Is there any tut for that too? |
|
|
|
|
|
|
|
|
mat,
3rd Dec 2012, 4:36 PM |
|
|
Not yet NikMan, good idea though, stay tuned  |
|
|
|
|
|
|
|
|
|
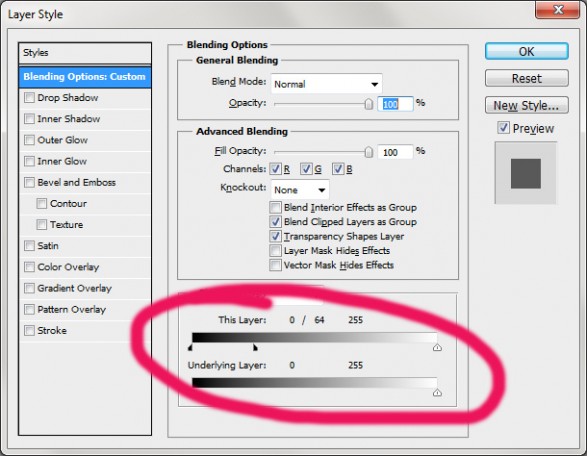
Hey, I loved this tut. You could play with more blending options (see the pic) to improve you final edit.
 |
|
|
|
|
|
|
|
|
|
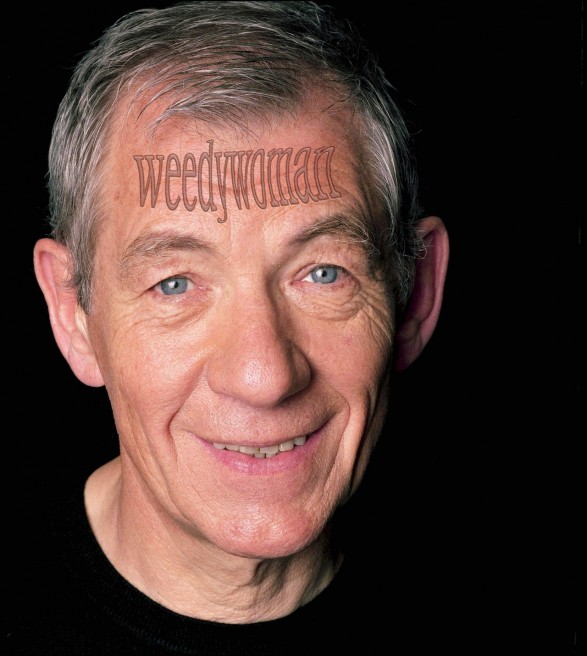
I used the warp (with rasterize) before playing the tutorial and my final result is below:
 |
|
|
|
|
|
|
|
|
mat,
4th Dec 2012, 1:11 AM |
|
|
Looks good but I think you forgot to set the red colors for Inner and Outer Glow in Blending Options. Check out step 16 and 17 of the tutorial.
|
|
|
|
|
|
|
|
|
|
| A very smart approach to explain the things, I like yourstep by step tutorial, |
|
|
|
|
|
|
|
|
Gruber,
18th Dec 2012, 2:39 AM |
|
|
It could be better, looks a bit unrealistic.
|
|
|
|
|
|
|
|
|
mat,
18th Dec 2012, 2:44 AM |
|
|
Thank you sila, step-by-step approach is the key. 
It could always be better Gruber, but then things get too complicated and beginners might have a hard time following the tutorial.
|
|
|
|
|


 How to remove teeth and eyebrows with Photoshop
 Impressive looking eyes on a girl using Photoshop